الجمعة، 24 فبراير 2012

PC Decrapifier


The PC Decrapifier  

 Is really a program designed to remove or uninstall a selected list of unwanted software in an unattended fashion. It may be used to clean off most on the annoying software that is commonly shipped with new Personal computers.


  •  The PC Decrapifier comes with a wizard style interface to assist you choose and remove the garbage clogging up your personal computer.


  • Nothing will likely be removed before you agree. You'll be shown some sort of checklist of recommendations 1st. You can even uncover the top applications other people remove.


  • You will be guided through the process with a "wizard" style series of questions. You will have the choice to pick and choose what you want to remove. It will not begin removing anything without prompting you first!


    Click the images below to see a screen shot of various parts of the process.
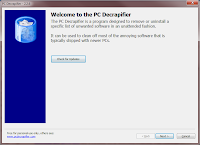


    Welcome


    From the welcome screen you can always check to make sure you're running the latest version of the PC Decrapifier.


    Create a Restore Point


    Next, you can create a restore point. This can be useful to recover from an unexpected error. Using a restore point won't bring back any programs that were accidentally removed, but can be useful for driver problems.
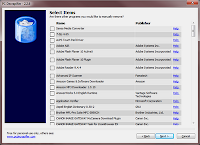


    Select Items


    Here's the list of items that the PC Decrapifier found on your computer that it knows something about. These are things that can be removed in an automated fashion that don't require you to click through a bunch of prompts.


    Additional Items

    Finally, here's a list of everything else on your PC. Did we miss anything? If so, select it here and the standard uninstaller will launch so that you can remove it. For these, you will see some prompts pop up asking you to confirm removal.


الخميس، 23 فبراير 2012

Windows Vista: Disable UAC

User Account Control


Windows UAC

(UAC) is a technology and security infrastructure introduced with Microsoft's Windows Vista.

It aims to enhance the security of Microsoft Windows by limiting software software to standard consumer privileges until an administrator authorizes a rise or elevation. In this way, only applications trusted from the user may receive admin privileges, and malware ought to be kept from compromising the operating system. In other words, a user account could possibly have administrator privileges assigned into it, but applications that the user runs do not inherit those privileges unless there're approved beforehand or the user explicitly authorizes it.


Windows UAC


  1. Click on the Start Button   and click RUN.

  2. In the RUN box type  msconfig  and click OK.

  3. Click on the TOOLS tab and locate Disable UAP highlight it and click on LAUNCH button.

  4. Click APPLY then OK.

  5. If prompt to RESTART you may choose to restart now or later any time.

  6. Finished.


ALTERNATE Version:


  1. Click on the 
    Start Button    and go to the Control Panel.

  2. In the Control Panel search box, search for "disable uac".

  3. Click on Turn User Account Control (UAC) on or off.

  4. Uncheck Use User Account Control (UAC) to help protect your computer.

  5. Click OK and you are finished.


Windows Vista: Disk Cleanup

Hard Drive Clean Up

If you wish to reduce the number of unnecessary files on the hard disk to take back disk space and help your pc run faster, use Hard disk drive Cleanup. It removes temporary files, empties the Recycling Bin, and removes a selection of system files and other items that you don't need.


  1. Open Disk Cleanup by clicking the Start button Picture of the Start button,
    clicking All
    Programs
    , clicking Accessories,
    clicking System
    Tools
    , and then clicking Disk Cleanup.

  2. In the Disk Cleanup Options dialog box, choose whether you want to
    clean up your own files only or all of the files on the computer. Administrator permission required If you are prompted for an
    administrator password or confirmation, type the password or provide
    confirmation.

  3. If the Disk Cleanup: Drive Selection dialog box appears, select the hard
    disk drive that you want to clean up, and then click OK.

  4. Click the Disk Cleanup tab, and then select the check boxes
    for the files you want to delete.

  5. When you finish selecting the files you want to delete, click OK, and then click Delete files to confirm the operation. Disk Cleanup
    proceeds to remove all unnecessary files from your computer.


الأربعاء، 22 فبراير 2012

Windows Vista: Hard Drive Defrag

Defragmenting your hard disk


Fragmentation tends to make your disk drive do extra work that could slow down your personal computer. Disk Defragmenter rearranges fragmented data which means your hard disk can function more correctly. Disk Defragmenter runs using a schedule, but you may also defragment your disk drive manually.


  1. Open Disk Defragmenter by clicking the Start button Picture of the Start button, clicking All Programs, clicking Accessories, clicking System Tools, and then clicking Disk Defragmenter.Administrator permission required If you are prompted for an administrator password or confirmation, type the password or provide confirmation.


  2. Click Defragment Now.


Disk Defragmenter might take from several minutes to a few hours to conclude, depending on the particular size and level of fragmentation of your disk drive. You can still use your pc during the defragmentation process.

الخميس، 9 فبراير 2012

Windows XP SP3


Windows XP SP3 is already installed?


  • Windows XP Service Pack 3 (SP3) is an important update that includes previously released security, performance, and stability updates for Windows XP.


  • Click Start, right-click My Computer, and then click Properties.


    If Service Pack 3 is listed in the System section, SP3 is already installed on your computer and you don't need to follow the instructions below.


  1. Before you begin

  2. Installing SP3 using Windows Update (recommended)

  3. Manually installing SP3 using the Microsoft Download Center or a CD

  4. Uninstalling SP3

  5. Help stay safe and keep your computer up to date


Repair Network Connection


To attempt to automatically repair your network connection


  1. Click Start, and then click Control Panel.


  2. Under Pick a Category, click Network and Internet Connections.


  3. In the Network and Internet Connections window, under or pick a Control Panel icon, click Network Connections.


  4. Right-click your network connection, and then click Repair. If Repair is not available, make sure the network cable is connected and the network connection is enabled.


  5. Windows XP will attempt to repair your network connection. If it is unsuccessful, it will display a message describing the problem. After it is done, click Close.


Tip - Windows XP can fix most common configuration and software problems. However,Windows XP cannot fix problems with your modem or network. Windows XP also cannot fix hardware problems, such as a disconnected network cable or a faulty network card.

Windows XP Firewall


To verify that Windows Firewall is enabled


  1. Click Start, and then click Control Panel.


  2. In Control Panel, click Security Center.


    • If Windows Firewall shows On, you are protected.


    • If Windows Firewall shows OFF, it has been disabled.


Fore more information about Windows Firewall and how to use it visit the Microsoft Windows Firewall.

Connecting Wireless

Most computers have wireless networking built-in. If your computer doesn't have a wireless network adapter, you can install one. The type of adapter you install depends on your computer and your level of expertise.

To find out if you have a wireless network adapter or how to install a wireless network in your home please visit the Microsoft Wireless Center.

Computer wont start


How to fix a computer that won't start


A computer that won't boot is frustrating, but the problem is generally easy to fix. The steps you take to troubleshoot the issue depend on your symptoms. Click the account that best describes your issue to find a possible solution:


Disconnect unused network drives


To disconnect unused network drives


  1. Click Start, and then click My Computer.


  2. On the Tools menu, click Disconnect Network Drive.


  3. Select the network drives that you no longer need, and then click OK.


Defragment your computer


To defragment your computer


  1. Click Start, and then click My Computer.


  2. Right-click Local Disk, and then click Properties.


  3. Click the Tools tab, and then click Defragment Now.


  4. The Disk Defragmenter dialog box appears. Click your hard disk drive, and then click Defragment.


  5. Disk Defragmenter will work for at least several minutes, although it might take several hours. When prompted, click Close.


    Tip - If you have more than one hard disk drive, repeat this process for each hard disk drive listed, starting at step 4.


Disk Clean Up


To run the Disk Cleanup tool


  1. Click Start, and then click My Computer.


  2. Right-click Local Disk, and then click Properties.


  3. On the General tab, click the Disk Cleanup button. Disk Cleanup will spend a few minutes examining your disk.


  4. The Disk Cleanup dialog box will appear. Select each of the check boxes in theFiles to delete list, and then click OK.


  5. When prompted, click Yes. Disk Cleanup will spend several minutes removing these files, which will provide you with more space.


    Tip - If you have more than one hard disk drive, repeat this process for each hard disk drive listed in My Computer.


Windows XP


Microsoft Windows XP


Windows XP is an operating system produced by Microsoft for use on personal computers, including home and business desktops, laptops and media centers. First released to computer manufacturers on August 24, 2001, it is the second most popular version of Windows, based on installed user base. The name "XP" is short for "eXPerience."


Windows XP, the successor to Windows 2000 and Windows Me, was the first consumer-oriented operating system produced by Microsoft to be built on the Windows NT kernel. Windows XP was released worldwide for retail sale on October 25, 2001, and over 400 million copies were in use in January 2006. It was succeeded by Windows Vista in January 2007. Direct OEM and retail sales of Windows XP ceased on June 30, 2008. Microsoft continued to sell Windows XP through their System Builders (smaller OEMs who sell assembled computers) program until January 31, 2009.


The NT-based versions of Windows, which are programmed in CC++, and assembly, are known for their improved stability and efficiency over the 9x versions of Microsoft Windows. Windows XP presented a significantly redesigned graphical user interface, a change Microsoft promoted as more user-friendly than previous versions of Windows. A new software management facility called Side-by-Side Assembly was introduced to ameliorate the "DLL hell" that plagues 9x versions of Windows. It is also the first version of Windows to use product activation to combat illegal copying.


During development, the project was codenamed "Whistler", after Whistler, British Columbia, as many Microsoft employees skied at the Whistler-Blackcomb ski resort.


According to web analytics data generated by W3Schools, from September 2003 to July 2011, Windows XP was the most widely used operating system for accessing the internet. As of January 2012, Windows XP market share is at 32.6% after having peaked at 76.1% in January 2007.


Microsoft Windows XP
Screenshot of Windows XP


Windows XP
Part of the Microsoft Windows family
Developer
Microsoft Corporation
WebsiteWindows XP: Homepage
Releases
Release dateRTM: August 24, 2001

Retail: October 25, 2001; 10 years ago [info]
Current version5.1 (Build 2600: Service Pack 3) (April 21, 2008; 3 years ago) [info]
Source modelClosed sourceShared source[1]
LicenseProprietary commercial software
Kernel typeHybrid
Update methodWindows Update

Windows Server Update Services(WSUS)

System Center Configuration Manager(SCCM)
Platform supportIA-32x86-64 and Itanium
Preceded byWindows Me and Windows 2000
Succeeded byWindows Vista
Support status
Mainstream supportEnded on April 14, 2009[2]
Extended supportExtended Support until April 8, 2014 for Windows XP with Service Pack 3 and Windows XP x64 Edition with Service Pack 2[2]
Downgrade supportAvailable until January 14, 2020[3]
Further reading


[ Source: Wikipedia | Copyright info: Used with permission from Microsoft. ]